Configuring Webhooks
Atlantis needs to receive Webhooks from your Git host so that it can respond to pull request events.
Prerequisites
- You have created an access credential
- You have created a webhook secret
- You have deployed Atlantis and have a url for it
See the instructions for your specific provider below.
GitHub/GitHub Enterprise
You can install your webhook at the organization level, or for each individual repository.
NOTE
If only some of the repos in your organization are to be managed by Atlantis, then you may want to only install on specific repos for now.
When authenticating as a GitHub App, Webhooks are automatically created and need no additional setup, beyond being installed to your organization/user account after creation. Refer to the GitHub App setup section for instructions on how to do so.
If you're installing on the organization, navigate to your organization's page and click Settings. If installing on a single repository, navigate to the repository home page and click Settings.
- Select Webhooks or Hooks in the sidebar
- Click Add webhook
- set Payload URL to
http://$URL/events(orhttps://$URL/eventsif you're using SSL) where$URLis where Atlantis is hosted. Be sure to add/events - double-check you added
/eventsto the end of your URL. - set Content type to
application/json - set Secret to the Webhook Secret you generated previously
- NOTE If you're adding a webhook to multiple repositories, each repository will need to use the same secret.
- select Let me select individual events
- check the boxes
- Pull request reviews
- Pushes
- Issue comments
- Pull requests
- leave Active checked
- click Add webhook
- See Next Steps
GitLab
If you're using GitLab, navigate to your project's home page in GitLab
- Click Settings > Webhooks in the sidebar
- set URL to
http://$URL/events(orhttps://$URL/eventsif you're using SSL) where$URLis where Atlantis is hosted. Be sure to add/events - double-check you added
/eventsto the end of your URL. - set Secret Token to the Webhook Secret you generated previously
- NOTE If you're adding a webhook to multiple repositories, each repository will need to use the same secret.
- check the boxes
- Push events
- Comments
- Merge Request events
- leave Enable SSL verification checked
- click Add webhook
- See Next Steps
Gitea
If you're using Gitea, navigate to your project's home page in Gitea
- Click Settings > Webhooks in the top- and then sidebar
- Click Add webhook > Gitea (Gitea webhooks are service specific, but this works)
- set Target URL to
http://$URL/events(orhttps://$URL/eventsif you're using SSL) where$URLis where Atlantis is hosted. Be sure to add/events - double-check you added
/eventsto the end of your URL. - set Secret to the Webhook Secret you generated previously
- NOTE If you're adding a webhook to multiple repositories, each repository will need to use the same secret.
- Select Custom Events...
- Check the boxes
- Repository events > Push
- Issue events > Issue Comment
- Pull Request events > Pull Request
- Pull Request events > Pull Request Comment
- Pull Request events > Pull Request Reviewed
- Pull Request events > Pull Request Synchronized
- Leave Active checked
- Click Add Webhook
- See Next Steps
Bitbucket Cloud (bitbucket.org)
- Go to your repo's home page
- Click Settings in the sidebar
- Click Webhooks under the WORKFLOW section
- Click Add webhook
- Enter "Atlantis" for Title
- set URL to
http://$URL/events(orhttps://$URL/eventsif you're using SSL) where$URLis where Atlantis is hosted. Be sure to add/events - double-check you added
/eventsto the end of your URL. - Keep Status as Active
- Don't check Skip certificate validation because NGROK has a valid cert.
- Select Choose from a full list of triggers
- Under Repository uncheck everything
- Under Issues leave everything unchecked
- Under Pull Request, select: Created, Updated, Merged, Declined and Comment created
- Click Save

- See Next Steps
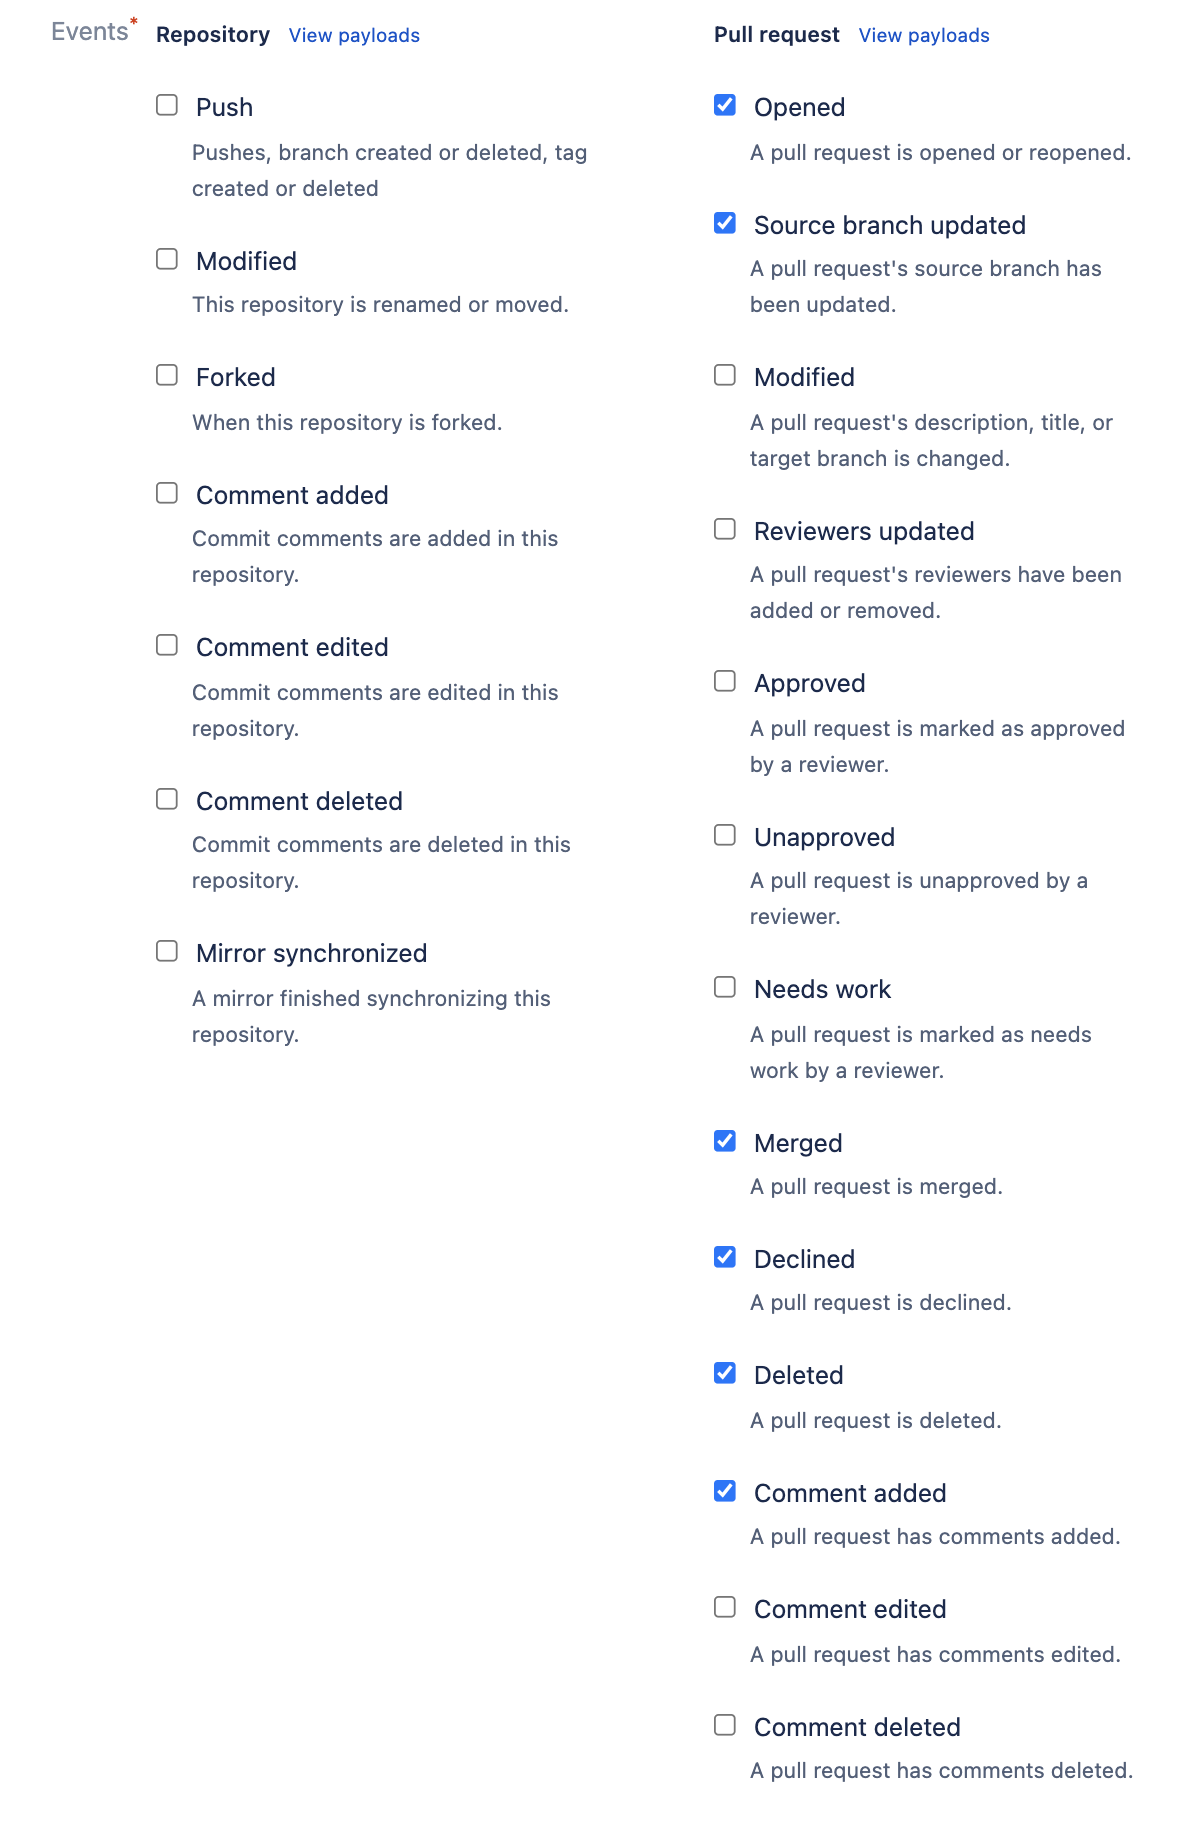
Bitbucket Server (aka Stash)
- Go to your repo's home page
- Click Settings in the sidebar
- Click Webhooks under the WORKFLOW section
- Click Create webhook
- Enter "Atlantis" for Name
- set URL to
http://$URL/events(orhttps://$URL/eventsif you're using SSL) where$URLis where Atlantis is hosted. Be sure to add/events - Double-check you added
/eventsto the end of your URL. - Set Secret to the Webhook Secret you generated previously
- NOTE If you're adding a webhook to multiple repositories, each repository will need to use the same secret.
- Under Pull Request, select: Opened, Source branch updated, Merged, Declined, Deleted and Comment added
- Click Save
- See Next Steps
Azure DevOps
Webhooks are installed at the team project level, but may be restricted to only fire based on events pertaining to specific repos within the team project.
- Navigate anywhere within a team project, ie:
https://dev.azure.com/orgName/projectName/_git/repoName - Select Project settings in the lower-left corner
- Select Service hooks
- If you see the message "You do not have sufficient permissions to view or configure subscriptions." you need to ensure your user is a member of either the organization's "Project Collection Administrators" group or the project's "Project Administrators" group.
- To add your user to the Project Collection Build Administrators group, navigate to the organization level, click Organization Settings and then click Permissions. You should be at
https://dev.azure.com/<organization>/_settings/groups. Now click on the <organization>/Project Collection Administrators group and add your user as a member. - To add your user to the Project Administrators group, navigate to the project level, click Project Settings and then click Permissions. You should be at
https://dev.azure.com/<organization>/<project>/_settings/permissions. Now click on the <project>/Project Administrators group and add your user as a member.
- Click Create subscription or the green plus icon to add a new webhook
- Scroll to the bottom of the list and select Web Hooks
- Click Next
- Under "Trigger on this type of event", select Pull request created
- Optionally, select a repository under Filters to restrict the scope of this webhook subscription to a specific repository
- Click Next
- Set URL to
http://$URL/eventswhere$URLis where Atlantis is hosted. Note that SSL, orhttps://$URL/events, is required if you set a Basic username and password for the webhook. Be sure to add/events - It is strongly recommended to set a Basic Username and Password for all webhooks
- Leave all three drop-down menus for
...to sendset to All - Resource version should be set to 1.0 for
Pull request createdandPull request updatedevent types and 2.0 forPull request commented on - NOTE If you're adding a webhook to multiple team projects or repositories (using filters), each repository will need to use the same basic username and password.
- Click Finish
Repeat the process above until you have webhook subscriptions for the following event types that will trigger on all repositories Atlantis will manage:
Pull request created (you just added this one)
Pull request updated
Pull request commented on
See Next Steps
Next Steps
- To verify that Atlantis is receiving your webhooks, create a test pull request to your repo.
- You should see the request show up in the Atlantis logs at an
INFOlevel. - You'll now need to configure Atlantis to add your Provider Credentials