Testing Locally
These instructions are for running Atlantis locally on your own computer so you can test it out against your own repositories before deciding whether to install it more permanently.
TIP
If you want to set up a production-ready Atlantis installation, read Deployment.
Steps:
Install Terraform
terraform needs to be in the $PATH for Atlantis. Download from Terraform
unzip path/to/terraform_*.zip -d /usr/local/binDownload Atlantis
Get the latest release from GitHub and unpackage it.
Download Ngrok
Atlantis needs to be accessible somewhere that github.com/gitlab.com/bitbucket.org or your GitHub/GitLab Enterprise installation can reach. One way to accomplish this is with ngrok, a tool that forwards your local port to a random public hostname.
Download ngrok and unzip it.
Start ngrok on port 4141 and take note of the hostname it gives you:
./ngrok http 4141In a new tab (where you'll soon start Atlantis) create an environment variable with ngrok's hostname:
URL="https://{YOUR_HOSTNAME}.ngrok.io"Create a Webhook Secret
GitHub and GitLab use webhook secrets so clients can verify that the webhooks came from them.
Create a random string of any length (you can use random.org) and set an environment variable:
SECRET="{YOUR_RANDOM_STRING}"Add Webhook
Take the URL that ngrok output and create a webhook in your GitHub, GitLab or Bitbucket repo:
GitHub or GitHub Enterprise Webhook
Expand
- Go to your repo's settings
- Select Webhooks or Hooks in the sidebar
- Click Add webhook
- set Payload URL to your ngrok url with
/eventsat the end. Ex.https://c5004d84.ngrok.io/events - double-check you added
/eventsto the end of your URL. - set Content type to
application/json - set Secret to your random string
- select Let me select individual events
- check the boxes
- Pull request reviews
- Pushes
- Issue comments
- Pull requests
- leave Active checked
- click Add webhook
GitLab or GitLab Enterprise Webhook
Expand
- Go to your repo's home page
- Click Settings > Webhooks in the sidebar
- set URL to your ngrok url with
/eventsat the end. Ex.https://c5004d84.ngrok.io/events - double-check you added
/eventsto the end of your URL. - set Secret Token to your random string
- check the boxes
- Push events
- Comments
- Merge Request events
- leave Enable SSL verification checked
- click Add webhook
Bitbucket Cloud (bitbucket.org) Webhook
Expand
- Go to your repo's home page
- Click Settings in the sidebar
- Click Webhooks under the WORKFLOW section
- Click Add webhook
- Enter "Atlantis" for Title
- Set URL to your ngrok url with
/eventsat the end. Ex.https://c5004d84.ngrok.io/events - Double-check you added
/eventsto the end of your URL. - Keep Status as Active
- Don't check Skip certificate validation because NGROK has a valid cert.
- Select Choose from a full list of triggers
- Under Repositoryuncheck everything
- Under Issues leave everything unchecked
- Under Pull Request, select: Created, Updated, Merged, Declined and Comment created
- Click Save

Bitbucket Server (aka Stash) Webhook
Expand
- Go to your repo's home page
- Click Settings in the sidebar
- Click Webhooks under the WORKFLOW section
- Click Create webhook
- Enter "Atlantis" for Name
- Set URL to your ngrok url with
/eventsat the end. Ex.https://c5004d84.ngrok.io/events - Double-check you added
/eventsto the end of your URL. - Set Secret to your random string
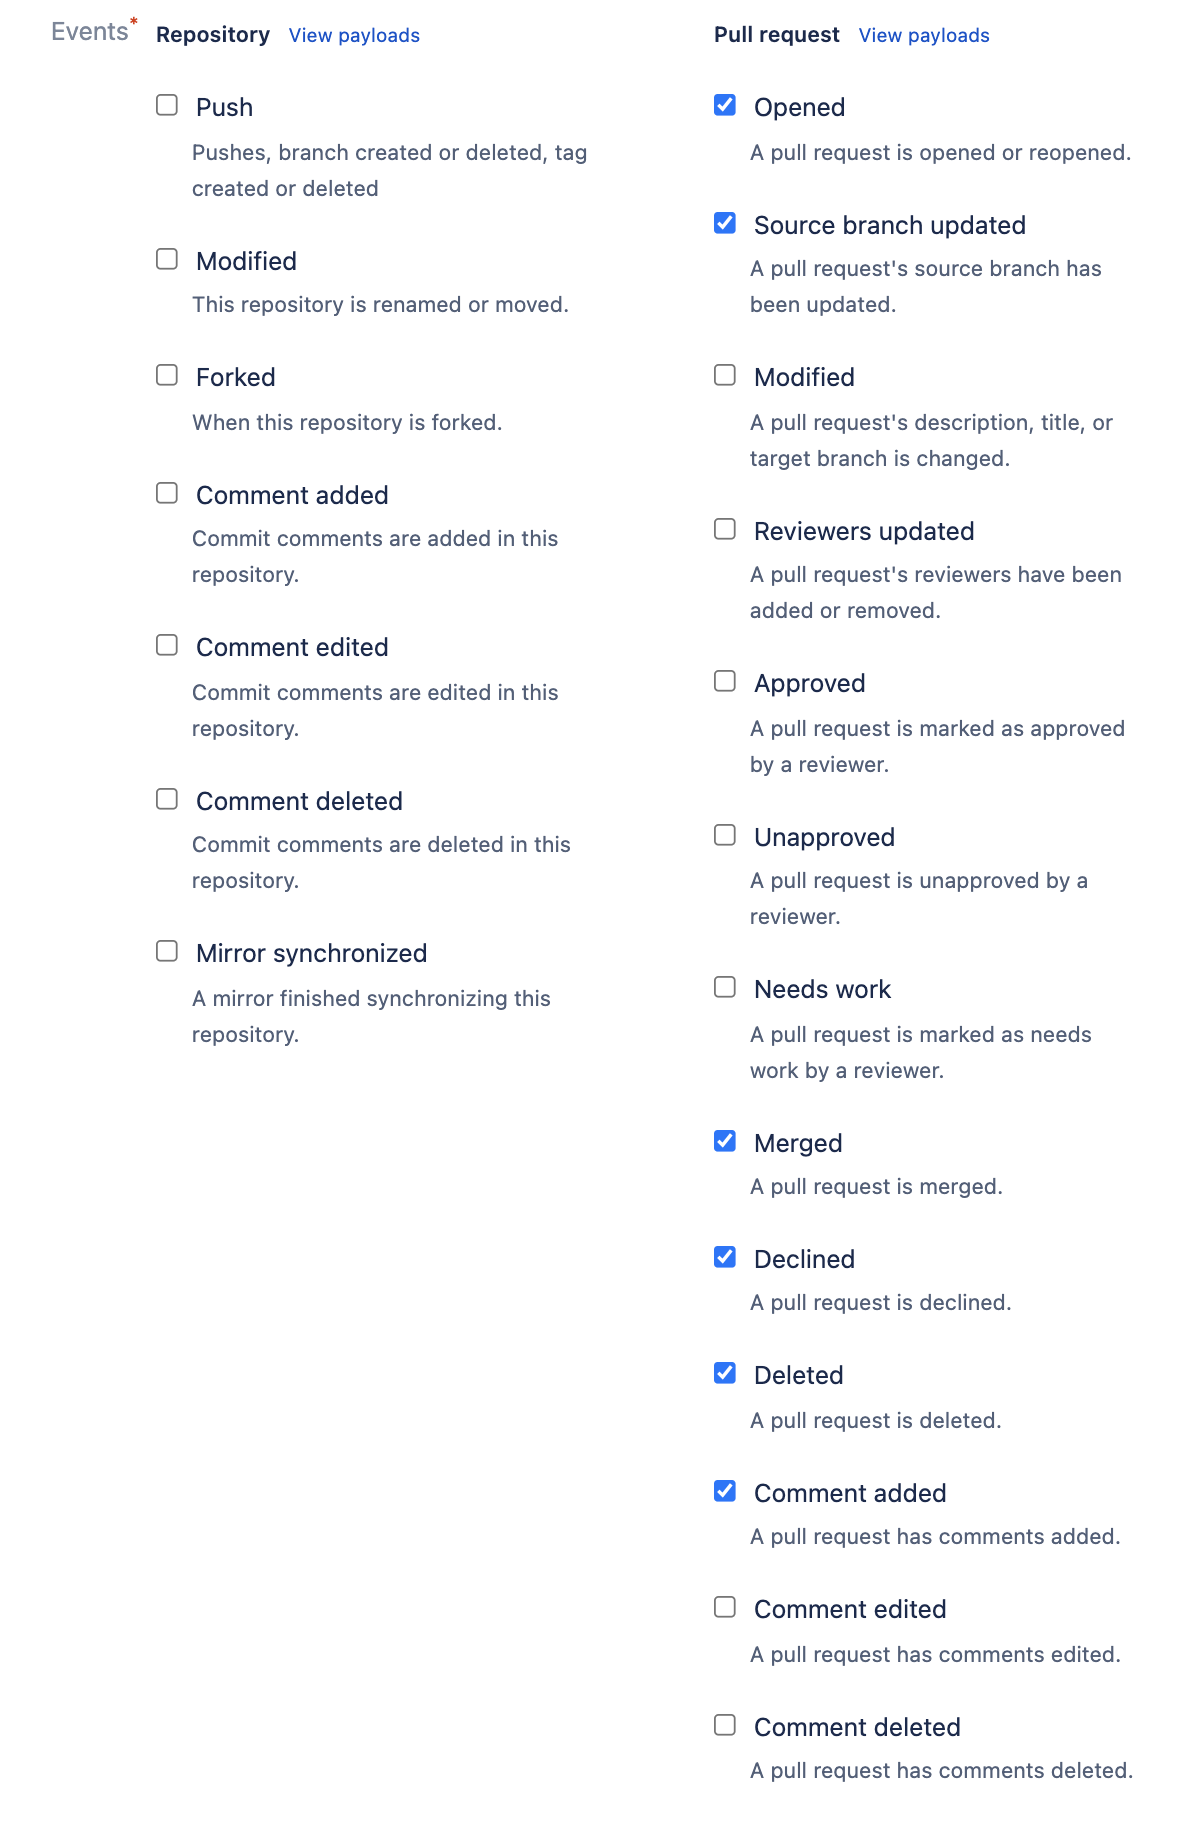
- Under Pull Request, select: Opened, Source branch updated, Merged, Declined, Deleted and Comment added
- Click Save
Gitea Webhook
Expand
- Click Settings > Webhooks in the top- and then sidebar
- Click Add webhook > Gitea (Gitea webhooks are service specific, but this works)
- set Target URL to
http://$URL/events(orhttps://$URL/eventsif you're using SSL) where$URLis where Atlantis is hosted. Be sure to add/events - double-check you added
/eventsto the end of your URL. - set Secret to the Webhook Secret you generated previously
- NOTE If you're adding a webhook to multiple repositories, each repository will need to use the same secret.
- Select Custom Events...
- Check the boxes
- Repository events > Push
- Issue events > Issue Comment
- Pull Request events > Pull Request
- Pull Request events > Pull Request Comment
- Pull Request events > Pull Request Reviewed
- Pull Request events > Pull Request Synchronized
- Leave Active checked
- Click Add Webhook
- See Next Steps
Create an access token for Atlantis
We recommend using a dedicated CI user or creating a new user named @atlantis that performs all API actions, however for testing, you can use your own user. Here we'll create the access token that Atlantis uses to comment on the pull request and set commit statuses.
GitHub or GitHub Enterprise Access Token
- Create a Personal Access Token
- create a token with repo scope
- set the token as an environment variable
TOKEN="{YOUR_TOKEN}"GitLab or GitLab Enterprise Access Token
- follow GitLab: Create a personal access token
- create a token with api scope
- set the token as an environment variable
TOKEN="{YOUR_TOKEN}"Bitbucket Cloud (bitbucket.org) Access Token
- follow BitBucket Cloud: Create an app password
- Label the password "atlantis"
- Select Pull requests: Read and Write so that Atlantis can read your pull requests and write comments to them
- set the token as an environment variable
TOKEN="{YOUR_TOKEN}"Bitbucket Server (aka Stash) Access Token
- Click on your avatar in the top right and select Manage account
- Click HTTP access tokens in the sidebar
- Click Create token
- Name the token atlantis
- Give the token Read Project permissions and Write Pull request permissions
- Choose an Expiry option Do not expire or Expire automatically
- Click Create and set the token as an environment variable
TOKEN="{YOUR_TOKEN}"Gitea Access Token
- Go to "Profile and Settings" > "Settings" in Gitea (top-right)
- Go to "Applications" under "User Settings" in Gitea
- Create a token under the "Manage Access Tokens" with the following permissions:
- issue: Read and Write
- repository: Read and Write
- Record the access token
Start Atlantis
You're almost ready to start Atlantis, just set two more variables:
USERNAME="{the username of your GitHub, GitLab or Bitbucket user}"
REPO_ALLOWLIST="$YOUR_GIT_HOST/$YOUR_USERNAME/$YOUR_REPO"
# ex. REPO_ALLOWLIST="github.com/runatlantis/atlantis"
# If you're using Bitbucket Server, $YOUR_GIT_HOST will be the domain name of your
# server without scheme or port and $YOUR_USERNAME will be the name of the **project** the repo
# is under, **not the key** of the project.
Now you can start Atlantis. The exact command differs depending on your Git host:
GitHub Command
atlantis server \
--atlantis-url="$URL" \
--gh-user="$USERNAME" \
--gh-token="$TOKEN" \
--gh-webhook-secret="$SECRET" \
--repo-allowlist="$REPO_ALLOWLIST"
GitHub Enterprise Command
HOSTNAME=YOUR_GITHUB_ENTERPRISE_HOSTNAME # ex. github.runatlantis.io
atlantis server \
--atlantis-url="$URL" \
--gh-user="$USERNAME" \
--gh-token="$TOKEN" \
--gh-webhook-secret="$SECRET" \
--gh-hostname="$HOSTNAME" \
--repo-allowlist="$REPO_ALLOWLIST"
GitLab Command
atlantis server \
--atlantis-url="$URL" \
--gitlab-user="$USERNAME" \
--gitlab-token="$TOKEN" \
--gitlab-webhook-secret="$SECRET" \
--repo-allowlist="$REPO_ALLOWLIST"
GitLab Enterprise Command
HOSTNAME=YOUR_GITLAB_ENTERPRISE_HOSTNAME # ex. gitlab.runatlantis.io
atlantis server \
--atlantis-url="$URL" \
--gitlab-user="$USERNAME" \
--gitlab-token="$TOKEN" \
--gitlab-webhook-secret="$SECRET" \
--gitlab-hostname="$HOSTNAME" \
--repo-allowlist="$REPO_ALLOWLIST"
Bitbucket Cloud (bitbucket.org) Command
atlantis server \
--atlantis-url="$URL" \
--bitbucket-user="$USERNAME" \
--bitbucket-token="$TOKEN" \
--repo-allowlist="$REPO_ALLOWLIST"
Bitbucket Server (aka Stash) Command
BASE_URL=YOUR_BITBUCKET_SERVER_URL # ex. http://bitbucket.mycorp:7990
atlantis server \
--atlantis-url="$URL" \
--bitbucket-user="$USERNAME" \
--bitbucket-token="$TOKEN" \
--bitbucket-webhook-secret="$SECRET" \
--bitbucket-base-url="$BASE_URL" \
--repo-allowlist="$REPO_ALLOWLIST"
Azure DevOps
A certificate and private key are required if using Basic authentication for webhooks.
atlantis server \
--atlantis-url="$URL" \
--azuredevops-user="$USERNAME" \
--azuredevops-token="$TOKEN" \
--azuredevops-webhook-user="$ATLANTIS_AZUREDEVOPS_WEBHOOK_USER" \
--azuredevops-webhook-password="$ATLANTIS_AZUREDEVOPS_WEBHOOK_PASSWORD" \
--repo-allowlist="$REPO_ALLOWLIST"
--ssl-cert-file=file.crt
--ssl-key-file=file.key
Gitea
atlantis server \
--atlantis-url="$URL" \
--gitea-user="$ATLANTIS_GITEA_USER" \
--gitea-token="$ATLANTIS_GITEA_TOKEN" \
--gitea-webhook-secret="$ATLANTIS_GITEA_WEBHOOK_SECRET" \
--gitea-base-url="$ATLANTIS_GITEA_BASE_URL" \
--gitea-page-size="$ATLANTIS_GITEA_PAGE_SIZE" \
--repo-allowlist="$REPO_ALLOWLIST"
--ssl-cert-file=file.crt
--ssl-key-file=file.key
Create a pull request
Create a pull request so you can test Atlantis.
TIP
You could add a null resource as a test:
resource "null_resource" "example" {}Or just modify the whitespace in a file.
Autoplan
You should see Atlantis logging about receiving the webhook and you should see the output of terraform plan on your repo.
Atlantis tries to figure out the directory to plan in based on the files modified. If you need to customize the directories that Atlantis runs in or the commands it runs if you're using workspaces or .tfvars files, see atlantis.yaml Reference.
Manual Plan
To manually plan in a specific directory or workspace, comment on the pull request using the -d or -w flags:
atlantis plan -d mydir
atlantis plan -w staging
To add additional arguments to the underlying terraform plan you can use:
atlantis plan -- -target=resource -var 'foo=bar'Apply
If you'd like to apply, type a comment: atlantis apply. You can use the -d or -w flags to point Atlantis at a specific plan. Otherwise it tries to apply the plan for the root directory.
Real-time logs
The real-time terraform output for your command can be found by clicking into the status check for a given project in a PR which links to the log-streaming UI. This is a terminal UI where you can view your commands executing in real-time.
Next Steps
- If things are working as expected you can
Ctrl-Ctheatlantis servercommand and thengrokcommand. - Hopefully Atlantis is working with your repo and you're ready to move on to a production-ready deployment.
- If it's not working as expected, you may need to customize how Atlantis runs with an
atlantis.yamlfile. See atlantis.yaml use cases. - Check out our full documentation for more details.